September 12, 2014

"I Rewired it!"

Famous last words of Tim the ToolMan Taylor from Home Improvement....circa 1991-1999.


My hubby used to do this work on Helicopters, I'm so lucky he has the time to do this!  I was looking at $200-400 at a professional shop and they may not have done it they way we would like...aka the correct way.


We don't want the removal or failure of the running/clearance lights to affect the brake lights.  The old wiring caused issues when we removed all those lights to replace with new ones, the brakes didn't work correctly!  The wiring was ran around the whole trailer to each light and spliced in versus having each system on it's own circuit and connected to the main plug.


Steve ran the connector for the truck into a junction box where he can more easily run wires to the appropriate location.  If an electrical issue occurs with brake lights for example and the wire needs to be fixed we'll know the color of said wire and where in the junction box to disconnect it to rerun wire.  Hopefully we won't have future issues for a long time.


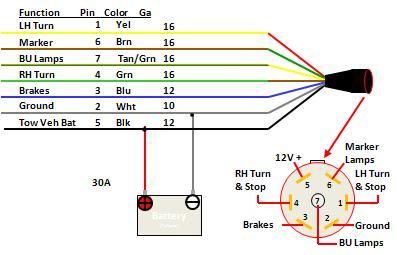
Steve started with the brakes.  The brake lines are supposed to be blue on the wiring diagrams.  So we went with that and then the white is the ground wire for the entire trailer.  


Black is the main power that then runs charge to the brown and green wires of the brakes and signal lights.  The red wire is for the running or clearance lights.


Some sections we had issues running the wire through the piping but we eventually go it through and on the outside where the break lights connect we used a nice sheath to protect as much exposed wire as possible.


After the brakes and lights were wired, Steve started on the running/clearance lights.  He riveted all the lights in and then easily attached them to the red wire.


An area in the tack room and in the very back of the trailer will have wire running along the outside of the piping since with all the wires in the pipe there was no way to thread it through.  Steve thinks we can just epoxy it in place. Its doable and will be out of reach from nibbling ponies.


So glad this is finally all done!  Yippeee!   Just have interior painting to finish but glad my trailer is back in a usable state

September 08, 2014

Minor Colic Episode

Friday I had another scare with Dani.  N called and stated she wasn't acting herself and didn't want her supplement that she normally gobbles.  She was also shivering pretty badly.  We'd had a low pressure system come through and it'd been drizzling all day.  I raced out with my horse blankets.  I hadn't brought them out yet since it was still summer time.

When I got to the barn M and N were standing with Dani and she was perky at least.  She'd been feeling a bit better they said.  I spent that evening walking her for about an hour.  Sometimes I heard the gas bubbles moving in her just standing next to her.  She would grunt as it moved....I know that feeling!  We kept walking and she became more and more herself, pushy even.

I put her grazing muzzle back on and then set her in the pasture to observe for a bit.  I must of sat for another 45 minutes.  She didn't roll or anything like that but just stood in one area.  I was waiting for a poop.  Finally she just laid down sternally and that worried me so I went out to check her while talking with a vet who didn't sound too worried.  Dani got up, the other horses came nearby and she started bossing them around.  Much more herself and then took a nice poop.

I felt much better heading home as she was being herself again.  N said she would keep a close eye on her and by the next morning there were no more worries.  I was relieved and hoping that she'd continue to be okay.  Over the weekend she continued to be fine.  Phew!

I wonder how many times horses have a mild tummy ache like this and we humans don't see them when it happens.  With this little episode it was only a couple hours of discomfort with no rolling, what if something like this has happened when I'm at work?  Guess it's fine when it's minor stuff like this.  I'm glad that N watches her boarded horses like a hawk!

September 04, 2014

Ewe Bots....

Ewe!  Bots eggs on ma ponay!!  I haven't seen that before, perhaps the warm and wet summer we've had has made them more prevalent.  I don't have a bot knife so borrowed a pumice stone from M at the barn.  Then I sprayed and whiped tons of bug away stuff on her legs.  Poor baby!  


I know it's not a big deal, remove the eggs and her fall worming treatment will be fine for killing any she ingested plus tapeworms but still.....YUCK!


I rode for a bit today doing some bending and lots of turns in circles, serpentines,...the usual.  First time we've been in the arena at the new barn.  It's not a cushy as KCRC but this winter I'm sure I can haul to KCRC on the weekends if I want to work on anything needing more cushion or the obstacles.

M came by after leading her horse by the neighboring high school and all it's activities.  I know we'll get a ride in some time together, I like her a lot.

Still been working on the trailer.  Hoping to get the wiring done this weekend so we can bring it to the barn for my storage use.

September 02, 2014

San Francisco

I headed out to San Francisco to meet up with the hubby for the weekend.  He had been out there for a week long conference so I joined him for the Labor Day weekend.  Never been to San Francisco.  Once I got over my claustrophobia of the cramped feeling any city creates for me, I really enjoyed our stay.


First stop was Alcatraz, Travis the traveling trout likes to get in many photo ops at these locations.  He enjoyed it too.


We lucked out with the garden tour since they only do it twice a week.  It was neat to learn about the gardening that occurred when it was a military prison and then a federal prison.  The park service has been working to restore the gardens only since 2003.


Though it was the dry season the gardens were still very pretty with many blooms.


The view of San Francisco from the south side of the island was awesome.  A little foggy that day but it was nice none the less. 


After the garden tours we took the audio tour of the prison itself.  It was interesting and made me very glad to be a law abiding citizen!


They sure crammed in the prisoners back then and currently did so with the tourists!


A former prisoner has written a book about his experience there and was available for photos and autographs of the book.  He was 84 years old.  Should be an interesting read.


We later ventured up steep hills in the City to see Lombard street, the crookedest street.  It was crazy with tourists standing in the road to get pictures.  We got a good enough picture from the sidewalk.  What a mess!


The homes were gorgeous and the streets were steep.  My stick shift vehicle would have been a beast to drive in this town!


We went to the Buena Vista to enjoy the famous Irish Coffees.


And walked up and down streets, visited fisherman's wharf....


And of course enjoyed riding the cable cars!


It was a fun little excursion.  Some cable car drivers were nicer than others and made for a fun trip.  Others made us want to bail and take the next car.


China town was cool one evening and we had a great dinner.


I enjoyed the lanterns lit up at night.


We also walked along the bay to the Golden Gate Bridge.  It was very windy that day but no fog anywhere!


Travis enjoyed the bridge too. 
 

The next day we went on an open bus tour of the city.  One portion brought us over the entire bridge, still a windy day but another gorgeous one with no fog.


It was a short trip and we could see going to the area again to take in Redwoods and Yosemite sights.  No horse sightings though....guess the steep steets would be way too much on horse knees!  Glad to be home and able to see my pony again.

August 26, 2014

A little bit here and a little bit there....

Steve and I have to wait for Amazon orders of wiring to come in.  We need stranded wire, specific guages and certain colors to make wiring and future fix ups work smoother.  We also want to make sure it's done correctly so if running lights go out it doesn't set the brake lights wonky....kinda like they are now!  All the different circuits are run and the whole system should be grounded to the tow vehicle.


While waiting for wire to arrive I've done work here and there, the tack room has all the caulk removed so I've worked on priming the walls and will continue with painting soon.  While I literally wait for the paint to dry I've been treating new areas in the horse area for rust.  I worked on the inside of the door.


There is still more caulking inside the horse area, so that will be a project to do while waiting for the paint layers in the tack room to dry.  I'm thinking I'll paint the upper horse area before I apply the Herculiner to the lower wall, I want to keep the nice black layer from getting paint flecks on it.

The dividers will be interesting to paint. Brush?  Sponge?  Roller?  I'll have to experiment to see what will work best.


When Steve was home this past weekend we began work on the gravel guards!  Finally!  We only installed the two on the fenders and since local stores didn't have black rivets I'll have to touch up those with a black paint.  I think they look sharp and can't wait to install the front gravel guard.


I will apply caulking around the fender to prevent water seepage under the guard and to smooth the sharper edges of the metal.  Even though the corners don't stick out Dani will find a way to hurt herself on it I'm sure!

August 25, 2014

Update on Dani's Leg

Dani’s leg had a wound with a flap that kept capturing grass pieces so I wasn’t content with just leaving it be and putting vetricyn on it as per advice of other horse people.  There was no way to keep the wound clean.  Called the vet for advice and to see if we needed to have the flap clipped.  We opted to go with sweat wrapping (DMSO and Furazone) and see if the flap either adhered or fell off.  After one wrap it fell off and the wound was looking very good.  After the third sweat wrap we went with a simpler bandage using only a pad with antibiotic ointment, cotton and vet wrap to include the bottom of the hoof bulbs to keep it on better. 


Dani is not an easy patient.  The second sweat wrap found her to be quite ornery with legs aimed to strike.  It was a three person team.  One to hold the good hind leg, another to wrap and another to try and distract her with tiny treats.  I also worked her beforehand, then I would handle her legs and if she did a slight kick off I sent her off again in the round pen.  She’s not lame but I don’t want to push her hard and hurt her but I can’t have her kicking like this.  I’ll have to continue work on this as her getting leg injuries seems to be “her thing” so I need her to be a good girl.

Today the wound looks much better so I decided to go with the original plan if she hadn't had the skin flap.  Spray vetricyn and let it be.  We'll see how it goes and if I'll need to bandage it again.


There is a riding instructor and trainer that N and M work with on Mondays, I may look in sometime and maybe schedule a lesson or two to work on her hind leg issues.  When they are worked with too much she gets fed up and it’s a bit dangerous.  She’s always stiffer when picking her hind legs, sometimes does a little kick out but not to “get you” and you have to wait for her to relax a bit and stretch her leg.  Usually she’s not trying to kick meanly but during this bandage changing situation, she very much was kicking out aggressively!

August 20, 2014

Tack Room Prep-Work

While I have the trailer in front of our house I figured I'd get the tack room prepped to receive a saddle rack.  I started removing the caulking where I plan to install the saddle rack.  I continued with caulk removal for the whole room.


It's pretty evident that the prior owners thought that just adding more caulk would solve the leaking problem with the tack room.  That totally doesn't make sense since you all probably remember the seam on the roof of the trailer.  If you don't fix the actual issue, no amount of caulk will stop the leak.


It really shocks me that one would not try to figure out that actual cause of the problem vs. "fixing" the manifestation of that problem.  A thatcher doesn't fix a leaky roof from the inside.  Remember that scene where Heath Ledger hops out to fix his dads roof in "Knights Tale"?  Same concept.  This trailer also had issues with leakage around the door of the tack room but instead of the old owners replacing the weather stripping they just applied caulk to areas they figured water was coming through. Oh and there is also evidence that duct tape was considered a solution as well!  What a mess!


After much scraping and chiseling and razor work I removed most of the caulk in some of the worst areas.  I will take a wire brush attachment for the drill and try and complete this job the best I can.  At least I can get to most of the rust in the seams and then caulk the outside....where the problem starts, and keep the area sealed.  Really since fixing the roof seam and the weather stripping on the door I haven't had issues of water getting into the tack room.  There are a couple additional areas on the tack room door that could use some sealing to make it perfect but I've fixed the leak issues that had lead to all the rust issues inside.  We'll get it fixed up nice.


While working, I'm on a stool to reach the ceiling easily.  Luckily the piping is hollow and has strategic holes for wiring so I can arrange my main tools within easy reach.  I use an old flathead screwdriver as the main tool along with box cutters and a razor blade to get at caulking that is bonded more strongly to the metal.  The pliers get tiny pieces out of the crevices and the mini wire brush cleans the grooves out really well and removes flaky rust.


And on a side note, one word of advice, before you start trailer restoration or heck...any farm work really, make sure you are up to date on your Tetanus vaccination!  Ouch!  Not as bad as it looks, nothing an angry bird Band-aid didn't fix!


With the rust now exposed I sanded and cleaned the surfaces really well and then applied Corroseal to the rusty areas.  


Hopefully I can prime and paint sometime this weekend in between assisting Steve with wiring and getting the saddle rack install. finish the rest of the tack room when I can.  After that, I'll have the horse area to finish up...including more caulk removal, oh joy!  Some areas in the horse area are exposed to possible rain so reapplication of caulk with be a necessary evil.

August 18, 2014

Herculean Handles

I purchased Herculiner with the intent on using this product in the area of the horse trailer that gets most beat up by hooves, the bottom portion of the inside walls.


My first test was to try it out on the two door handles, the escape door and the main door.  I applied it to the handles and to the catches.  There will need to be some touching up with white paint since some Herculiner leaked through the painters tape...but other than that I think it looks pretty nifty and will hopefully hold up to the beating these handles tend to receive.


This stuff is pretty hardcore tough just from what I've seen.  I think in hindsight I would have used Dupli-Color's brand for the handles since it's not as rough on the hands and not as thick...the doors take a bit more to shut now.  In the actual trailer I think the heavy duty quality will be awesome though.  Stay tuned...I still have outside caulking and paint touch-ups to do....plus we plan on rewiring ASAP so we can move the trailer to our new barn this coming weekend.

August 16, 2014

Woodn't You Like a New Wood Floor?

The floor is wonderful!  It's strong, it looks good and it will hold up for many years!  I'm so delighted.  Yes, the floor will get dirty and look less pristine in short time.  Yes, it will be covered with mats when in use so I won't be able to admire it's beauty.  Yes, horses and donkeys will poop and pee on it.  But I am cherishing the beauty of it right now and feeling very accomplished!!


I picked up the rest of the boards I needed and Steve began cutting.  We then slid the last few full size boards in the horse part and then the tack area.  Then we came to the rounded front.  Using the old boards as a template we were able to arrange the boards and draw where to cut each piece.


Steve started out with a jigsaw but that wasn't doing the job so we got a reciprocating saw to finish it up.  That did it and we were able to get those tricky pieces cut.  Installing them was pretty easy since they are shorter and you can more easily get them into the groove and slide into place.  There were a couple that he had to adjust the ends a few times and re-cut them but nothing terrible.  


The last piece was a full sized board but only 6 inches wide that Steve had to trim down the width on one side since the gap wasn't consistently wide.  It took lots of hammering with the mallet but we got the floor in and the floor is nice and tight.  Hopefully we won't have to add any more boards when the wood shrinks a bit.  I'm hoping the gaps will be perfectly sized to allow for the drainage without huge gaps.


The floor is finished and beautiful!  Me likie!  Now I can finish removing the interior caulk and treat the rusted areas. Then I can prime and paint.  We are racing around the far turn!!  I have final touches for the outside to complete still and of course the electrical will get done soon.


Even with the inside ugly and incomplete I can still utilize the tack room when I bring the trailer to my new barn.  I'm hoping these last steps will go smoothly.  Even if it rains I shouldn't have an issue working on the inside since it stays mostly dry.


Very satisfied.....